

As a long-time CRM business analyst, I’ve used the D365 bulk import wizard many, many times to import new and updated data into what is now Microsoft Dataverse. (I have given so many trainings to colleagues and clients that I could probably recite my Bulk Import script verbatim.)
As CRM features go, it’s fairly ancient, which translates into a multi-step, click-heavy process full of twists and wrong turns that can lead users to inadvertent data loss through a VLOOKUP-gone-bad— or at least, a report full of import errors to sort through. And so, I’ve been patiently waiting for the next-gen bulk import tool to appear for Dataverse.
Little did I know, it is already here!
I stumbled across this feature by accident, and it’s so damn useful that I’m kicking myself for not knowing about it earlier! My quick search engine research tells me that the Microsoft Power Apps Office add-in has been around since at least 2018, but given how few write-ups I’ve found, I can’t be the only one that missed its debut. The Power Apps Office add-in traces its roots to the D365 Finance & Operations Excel data connector (it looks like just a rebrand of the Microsoft Dynamics Office add-in), so I am pleased to see more technology alignment and benefits coming from Microsoft’s brand unification of the Dynamics 365 platform. A single data connector add-in for working across Dataverse and Unified Operations: yes, please!
If you also have yet to uncover this little gem, then this post is for you!

get the Microsoft Power Apps Office add-in
Getting this add-in is extremely straightforward, and once you install it, you can call it up in any Excel spreadsheet file.
- Open Microsoft Excel.
- Go to the Insert tab.
- Click Get Add-ins.
- Click on the “CRM” category or search for “PowerApps” (no space… curiously searching for “Power Apps” does not yield the correct results here!)
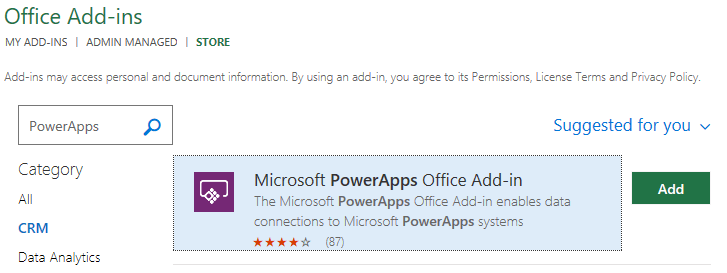
- Click Add and agree to the license terms.
Voilà! Your new add-in is now installed, and can be called up in any workbook by clicking on “My Add-ins” on the Insert tab.
connecting to Dataverse
The Power Apps Office add-in will appear as a right-hand menu once you activate it from the Insert tab. It doesn’t look like the add-in has gotten updates in a bit, as it still references “Common Data Service” and links out only to Dynamics LCS and an outdated add-in details page, but make no mistake– this will work perfectly with your Dataverse environments, no matter if they are Dynamics 365 CE, standalone Power Apps or even Dataverse for Teams databases.
If you choose, you can get a pre-packaged connection to Dataverse by downloading an export file from your model-driven app. This is similar to ye olde “Dynamic Worksheet” export tool, which works by maintaining a web query connection string driven from the Data – Queries & Connections tab of Excel. However, since it’s running through the add-in, it’s more robust and, importantly, allows changes to be pushed back to Dataverse.
log into the add-in with Dataverse credentials
Regardless of whether you download a file with the connection or start from scratch, you need to be signed into the add-in with the correct credentials of your Dataverse environment.
By default, you’ll be signed into the add-in with the same AAD credentials that you’re using for Excel. For many, this will be the correct credential set. However, if you need a higher level of access than your normal user account (like a service account), or maybe you’re working cross-tenant (say with a trial environment), you first need to sign out of the add-in and then sign back in to prevent error messages.
- Click on the person icon in the add-in ribbon and select “Sign Out”.
- Follow the add-in prompts to sign in again with the credentials you want to use.
edit data in Excel with pre-made connection
- In the Maker portal, navigate to Data > Tables and select your table.
- Click the Data dropdown and select Edit data in Excel.
- Open the Excel file from your downloads.
- Enable editing.
If you are signed in to the correct environment with the right level of access, the add-in will open in the right-hand pane and refresh the data automatically. If not, follow the steps above to sign into the correct user account.
create a new connection
While downloading a pre-made connection is perfectly fine, you should definitely learn how to create your own connection and data file from scratch. This will save you effort each time you want to manage the data, and give you finer control over the columns displayed.
- Click Add connection.
- Click the Connection magnifying glass to auto-discover environments.
- ❗ Auto-discover has not worked for me and throws an error message. I’m not sure if this is because I’m using trial environments or if there’s an issue with the add-in.
- If auto-discover does not work, change the CDS Endpoint from “Production” to “Direct Connect”.
- Enter your base Dataverse URL into the Connection field (“https:// [yourorgname] .crm.dynamics.com”).
- Click OK and then click through any app reload warning prompts which appear.
Now you are authenticated to your Dataverse environment through the add-in! The next step is to design your table.
design your data table
The add-in Designer allows you to connect a Dataverse table and control the fields. For this example, I’ll just use Dataverse Accounts, but you can use this add-in for pretty much any table. Including Portal Management tables.
The add-in will respect database-level restrictions, and there are a few field indicators to help remind you which data you can and cannot affect via the connector tool. Here are a few examples.
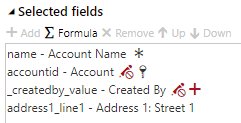
- The key 🔑 icon indicates the primary key field (accountid).
- You need to add this one in order to publish changes back to Dataverse.
- The red pencil ✏ icon (as seen on accountid and _createdby_value) indicate a read-only field.
- You can add these to your view, but any changes you attempt to make will be discarded when publishing.
- The star ✳ icon indicates required fields (name).
I’m not sure exactly what the red plus ➕ icon indicates. It tends to show up on read-only fields, but is also on the Status (statecode) field, so likely indicates complex data types, or rollup/calculated fields.
Notice that you can adjust the column order and even create a formula column. The formula column is interesting, because it cannot directly reference Dataverse schema names. For example, I tried to create a simple formula to transform the Account Name into uppercase. Trying to use the Dataverse name yielded a formula error, but putting in the Excel table reference worked just fine.
| Formula | Effect |
|---|---|
| =UPPER(name) | ❌ |
| =UPPER([@[Account Name]]) | ✔ |
The benefit of creating your Excel formula as a column within the add-in Designer is that it becomes a part of the table design, rather than a manually-added column. As you refresh the data from Dataverse, the formula is automatically applied to new rows and recalculates any updated values. Neat!
how many tables can I add?
At first blush, it appears as if the add-in will let you create multiple tables within the same workbook. You won’t be able to add two tables on top of each other on the same sheet (it thankfully throws an error), but it seems to let you add tables wherever there are free cells, including on additional worksheet tabs.
However, in practice, you can only have one connected table per workbook. Any additional tables you add will be blank, even when no errors are thrown.
If you need to manage multiple tables through the Power Apps Office add-in, you’ll need to take these steps multiple times.
publishing changes
My favorite part of this feature is how easy it is to push data updates back to Dataverse. The import process is lightning fast, and allows both existing updates and new rows to be pushed in the same action, bypassing the usual Bulk Import Wizard steps and the anxiety of refresh/refresh/refresh clicks watching it go through parsing and transforming and importing on the async service.
- Refresh your data table through the add-in to pull down the latest changes.
- Make updates to the data. You can use all your Excel tricks for bulk transformations and updates: find & replace, copy & paste, VLOOKUP(), INDEX()/MATCH() and other formula-driven methods. Just make sure that the original columns refreshed from Dataverse have all formulas converted to values before you publish.
- Add new rows at the bottom of your table.
- Leave the Primary Key GUID blank
- Add values for all required fields
- Delete entire rows to delete the record from Dataverse.
- Don’t just clear the cell values! You must highlight the row from the row selector on the left side of Excel and fully delete.
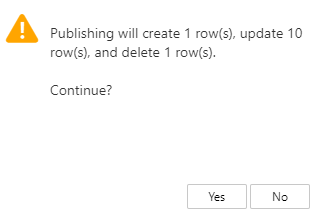
- Click Publish in the add-in.
- Confirm the Create/Update/Delete numbers match the changes you intended to make to the table.
After the rapid publishing & refresh cycle, you should now see your changes reflected in Dataverse and the GUIDs filled in for all new rows you added.
You will be alerted if there are any errors during the process. You can also review (and clear) all previous errors, alerts and warnings within the add-in by clicking on the small flag icon in the bottom right corner.
what about Dataverse for Teams?
I recently started on my DV4T journey by working on a canvas app for my team to use. Previously, I’d only used either Dataverse Pro or SharePoint lists as data sources for canvas app projects, and I was curious to learn more about Dataverse for Teams and where it might fit into my solutioning. (I’ll save my Teams-based canvas app building experience for another day).
One thing that really stymied me was the lack of data management tools in DV4T that I am accustomed to, coming from a CRM background as I do. I wanted a solution management experience for customizing the tables and views; I wanted a model-driven app experience to manage the data; and above all, I wanted BULK. TOOLS. FOR. IMPORT.
Perhaps the reality of my experience is due to how my organization has set up our DV4T permissions, but I felt blocked at every turn. Every “Edit data” button I could find in the Teams Maker Portal opened up the simple in-line editor. I was not able to access my DV4T environment through the normal browser-based Maker Portal. I could not connect to the database directly; the “Switch to classic” ribbon option sent me into an endless login loop.
[Update: I attempted this process for one of my DV4T environments today, and found that a UI update has removed this button. Leaving it up for posterity or those who have yet to be updated. See below for the new navigation!]
Finally, after clicking on every button and link I could find, I discovered this oddity of the Teams Maker Portal: in the Teams solution explorer, on a table, specifically on the Relationships subtab, there is a different ribbon button labeled Data. With an option called “Edit data in Excel”.

This option downloads an Excel spreadsheet file with the Microsoft Power Apps Office add-in connection pre-loaded in.
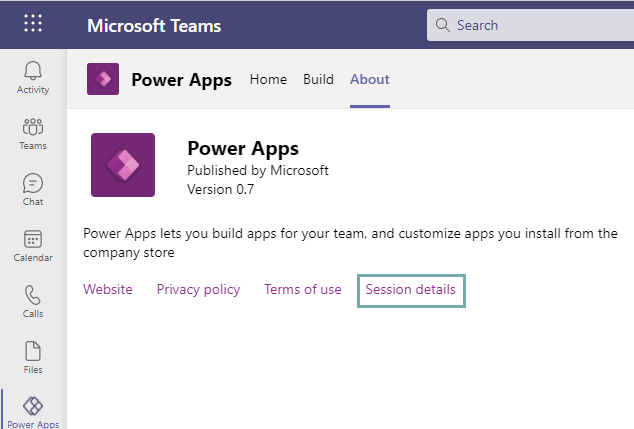
So, yes, THIS ALSO WORKS FOR DATAVERSE FOR TEAMS. The process is identical once you know your DV4T database URL. You can find this URL when editing your canvas app: click About and then Session details.
Update 01/13/2022 06/13/2022
Update 6/13/22: Microsoft’s latest updates to the Solution Explorer have thwarted the work-around to my work-around. 😟 I have struck out the guidance below, as it no longer holds true after the UI refresh.
There are no longer any places in the DV4T UI where the Edit data in Excel option can be found. This caused me no small amount of concern, since I need to be able to access my DV4T data in bulk so I can easily compare it to another data source to identify deltas (and going row-by-row, even for a small data set, is not the way I prefer to spend my afternoons). I clicked everywhere I could think of in the new Solution Explorer UI for DV4T, but the button looks to have been permanently squashed. Is this a sign that the Excel add-in for Power Apps / Dataverse is on its way to deprecation? (I hope not.)
🟢 Good News: in my desperation, I created the connection manually using my DV4T Instance URL as described above, and it still works. Back in January, I had attempted the manual connection and had problems with my custom tables. Perhaps that was just a bug that resolved on its own? In any case, I’m just relieved that this extremely useful feature seems to have survived another UI refresh and I got another 6 months out of it! Let’s hope Microsoft leaves it alone.
Seems like the DV4T UI is getting some updates. I was able to find the new method to edit the data in Excel after some digging around. It’s still not very intuitive, and somehow the option is only available in one specific location, so it’s easy to miss if you’re not as stubborn as I am.
I also found that getting the Instance URL and manually creating the connection will no longer yield successful results, at least in DV4T. None of my tables were showing up in the Design area any more after setting up the connection. This is disappointing, but I suppose not unexpected given it felt like a bit of a back-door to begin with. Closing that door leaves us with downloading an Excel file with the connection and table already pre-loaded.
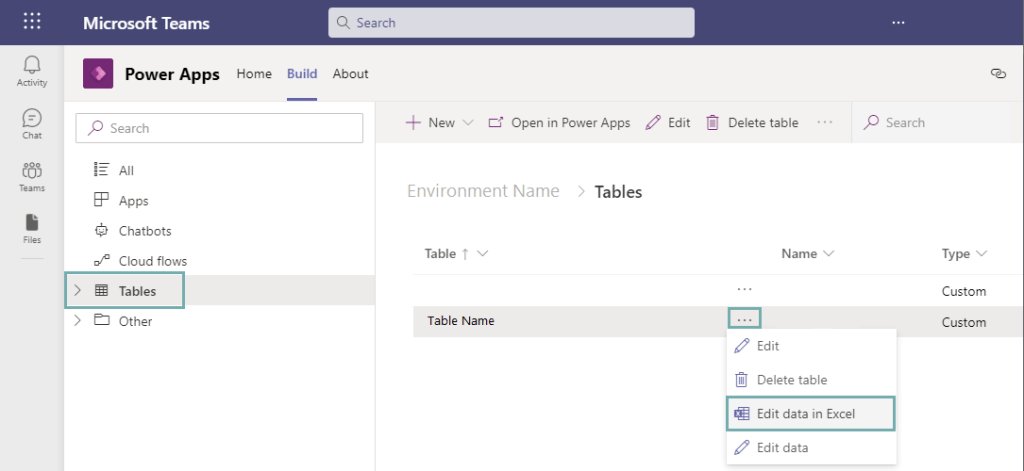
First, open up your DV4T environment in the Power Apps area of Teams, and go to the Build tab. Select your DV4T environment, and then click the “See all” option to open the new Solution Explorer experience. Next, click on Tables in the left nav menu. Don’t open the table you want to work with yet: you need the list of all Tables, which is the only place I have found these options.
From here, select your desired Table and click the three dots menu (…). Here you will find the Edit data in Excel option. This downloads the Excel file with the pre-loaded connection for this Table, and from here works the same as this original blog post.
This option has been removed throughout the DV4T Solution Explorer UI
conclusion
The Microsoft Power Apps Office add-in is an unsung hero of the Dataverse world! I hope that Microsoft continues to improve upon and advertise it as an excellent data tool for app makers and pro developers across the entirety of the Dataverse and Dynamics 365 suite.
For one-time bulk import needs, it’s a quick and easy way to build a tailored upload to handle all create, update and delete actions at the same time.
For on-going bulk import processes, the file can be saved either locally, to OneDrive for Business or within a Teams/SharePoint repository along with the configured connection, table design and formulas for a repeatable data management process with extremely minimal repeat setup time.
For Dataverse for Teams apps, it’s a killer way to get access to, initially seed and manage your data sets without needing to perform row-by-row data entry. [Update: so long as Microsoft doesn’t keep moving the buttons to access the options]
Have you used this add-in before? Let me know in the comments if you have any great experience to add!


What about dataflows?
LikeLike